The COVID-19 pandemic has rapidly accelerated the digitization of banking and innovation in new FinTech services. Customers are continuing to move online and this radical transformation is unlikely to reverse. As a result, we’re seeing more and more FinTech
companies and digital banks coming to market. If you are looking to start your own digital bank or any other FinTech services company, read our short guide about the most important steps for launching your digital bank, including a timeframe for each step.
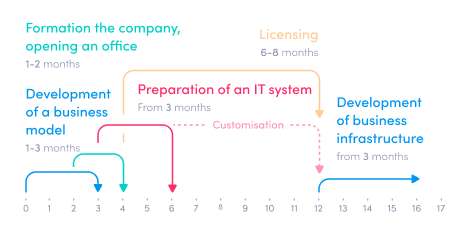
Figure 1: A standard timeline for launching a digital bank
Step 1: Developing a Business Model (1 – 3 months)
The first step in this process is to come up with a robust business model that will work over the long term. The best way to do this is to create a business plan that details all the relevant strategic information and decisions that will help clarify what
your digital bank or FinTech company is going to look like. Ideally, this is a living document that contains specific action steps for the short, medium, and long term respectively.
This business plan is a key document when you interact with investors and regulators because it gives a clear strategic plan of where you want to take the business and how you’re going to compete in the marketplace. Focus on making it as clear and understandable
as possible, so that all stakeholders can easily grasp what you’re aiming to build. This is the first thing that regulators and investors will use to evaluate your business proposition and the risks involved.
Business plans can vary depending on the context, but some key components that are always required include a vivid description of your target audience, details about the product solutions you want to offer, a unique value proposition that sets you apart
from the rest, and 3 years of financial forecasts that show how you are going to manage any capital that you receive.
Step 2: Form the Company and Open an Office (1 - 2 months)
Depending on which jurisdiction you’re in, you might need to register your company as a legal entity and open an office of some sort before you can apply for a Payment Institution or E-money institution license. Other regulators (like in Spain for example)
only need you to reserve a company name before you can apply for a license. So, it’s worth checking in with your regulator to understand the specific requirements.
When it comes to setting up an office, a regulator will tend to deem one as a place where management comes together to make executive decisions. This cannot be a co-working office space but must be an actual physical office with local employees. This shows
the regulator that you are serious and are ready to start operating.
Step 3: Obtain a License (6 – 8 months)
The simplest way to start operations is to become an EMD/PSD agent of a licensed company, but if you have big business ambitions and plan to grow, then choosing license shelter can be only a temporary option and you will need to receive your own E-Money
or Payment Institution license.
Here is a step-by-step guide to obtaining your E-Money or Payment Institution license:
a) Introduction to the Regulator
Certain regulators like in Lithuania, Latvia, or Spain will invite candidates to a pre-application meeting where they will need to answer some of the following questions:
- What is the planned business model and what services are planned to provide?
- Who will be the parties involved, and what functions, rights, responsibilities they will have?
- What will be the client base of the company?
- What is the structure of the company and the founding team?
- Where does the capital come from, or what are the origins of the funds?
- How your business is stable from a financial perspective?
- Depending on the business model and customer base – the AML topic will also be covered.
Based on those answers, if you meet the requirements you can then start preparing all the relevant documentation. Note, that this step doesn’t apply in all jurisdictions. For example, in the UK you would need to begin with preparation of all the documentation
without meeting the regulator.
b) Prepare and submit your documentation
This step is crucial but can be quite overwhelming due to the nature of the paperwork required. Do not expect to prepare all the documents yourself. For this stage, you will need the assistance of a consulting company like Advapay and experienced lawyers
to ensure that you’re aligned with everything that the regulator requires. Once all the documentation is submitted, it’s likely that the regulator might come back with questions and requests for additional documentation – so prepare for a back and forth process
until you get it right.
c) Form your team
Once your company has a clear business model and a selected jurisdiction, you then need to get some employees in place. Depending on the regulator, you may need between 2 and 8 people at the beginning. Bear in mind that it can take a long time to find
experienced staff to join you, so it’s worth getting ahead of this if you can. You will also have to submit documentation about your key personnel to the regulator as part of the process.
d) Open a business and safeguarding accounts
Next, you must open the business and safeguarding accounts and to show the regulator what measures are being taken to safeguard your client funds. The process can take up to 3 months or even longer and so we typically advise that you utilize the services
of a consultant who can help you deal with this process, rather than doing it on your own.
e) Pay the Initial Capital
The next step is to pay initial capital to meet your regulator’s requirements. Depending on the type of company you choose – an E-Money or Payment Institution - you will need to invest not less than 350 000 EUR or 125 000 EUR respectively. This might need
to be done before the application process, but typically it occurs after all your documentation has been submitted and approved.
f) Authorization and Passporting (for EU countries)
The last step is to receive the final confirmation from the regulator that your license has been granted and that you’re legally allowed to provide the specified services. If you’re based in the EU and plan to operate in different EU countries, you will
need to apply for passporting to operate in these specific countries.
Step 4: Prepare Your IT System for Operations (from 3 months)
Now, it’s time to set up your IT system. When submitting your application for a license, you need to declare the Core Banking system you plan to use during the licensing phase to the Regulator and submit all required documentation about this platform.
It can be your own developed platform or purchased from a software vendor, e.g.
Macrobank Core Banking.
Many regulators require a ready operating system on the date that the license is issued. Others give a year for ‘go live’ after which, an audit must be completed in order to receive an operational permit.
Step 5: Develop Your Business Infrastructure (from 3 months)
Now that you have a license and your IT system is in place, you can start developing your payment infrastructure and creating partnerships.
Start with activation of your safeguarding account (if you have opened the safeguarding account during the licensing stage) and open additional safeguarding accounts – as this will help you to offer broader services to your customers.
Then you need to decide how do you plan to issue IBANs to your customers – you can obtain a BIC number through SWIFT or find an IBAN sponsor.
As soon as you have developed relationships with bank(s) and can issue your IBANs, you can start your business. For the next step – you will need to develop partnerships with payment and other external service providers, for example, currency exchange providers,
card issuers, AML/KYC solution providers. All these solutions must be integrated with your Core banking system via APIs. As an alternative, you can buy a Core Banking platform with ready integrations with different service providers. This saves a lot of
time and money – allowing you just to sign agreements with these service providers and get started as quickly as possible.
___________________________
As you can see it's not an easy proposition to launch your own FinTech company or digital bank from scratch, but if you work systematically though each step and get the right advice from industry professionals, then you can make it happen. Follow this guide
and you’ll have your own digital bank in the very near future.
Good luck!